Gallery Member Binders
The SAA displays binders of member’s biographies in a prominent location of the gallery. These “Meet the Artist” profiles are very helpful to show to visitors who ask who you are – they love to know more about the artists behind the art. They want to know you! We want to help them find you and help you get your story out there. We have two binders – one for our “exhibiting” members and one for our regular members. Please keep your information up-to-date, include a photo of yourself if possible, and keep it to one page only. The web has many tips on effective artist bio writing; for example, this article. When done, just bring a printed copy of your profile to the gallery for inclusion in the binder.
Resizing Images for Online Publicity
Artists and event organizers often need to send images of art works for publication in online sites such as the SAA website, Facebook, and Meetup. Given the huge image file sizes generated by most cameras and smartphones today, it is best to resize the images to make them smaller before emailing them to the contact responsible for posting them. This ensures the recipient actually receives the email since most email services place a limit on how large an email can be. Email that exceeds the size limit will not be received at all!
Note that images destined for printing on paper, such as the newsletter, should be sent full-size, since most printers are higher resolution devices than display monitors. You may need to attach fewer images in each email in order for it to be sent successfully.
It’s easy to resize JPEG images using tools already available on most PCs. A good size for images posted online is about 1000 pixels wide for landscape orientation images and 1000 pixels high for portrait orientation images. An original JPEG weighing in at hefty 8 million bytes can easily be reduced to less than half a million and still look just as good on-screen.
For Microsoft Windows users, the following steps will produce a file of suitable size:
- Copy the image to your Windows PC
- Open the built-in Windows “Paint” application (search for it or look in Windows > Accessories)
- Open the artwork image file using the File > Open menu item in Paint
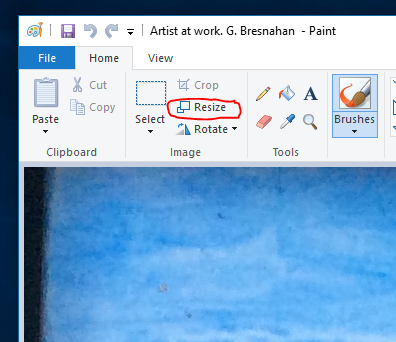
- Click the “Resize” tool
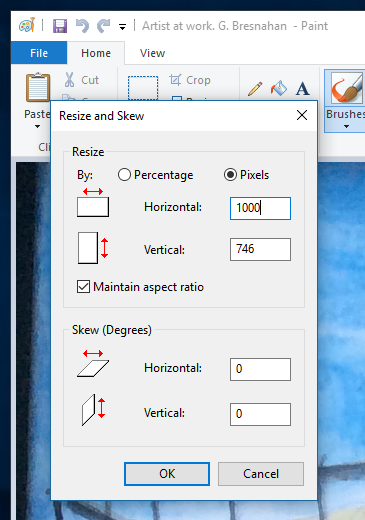
- Click the “Pixels” radio button
- The current size of the file will be shown in the Horizontal and Vertical fields – if they are both less than 1000, then the file is already small enough – just exit the application and send that file – do not try to make an image larger than it is (it will not look good) – if either number is bigger than 1000, then continue to the next step
- If your image is wider than it is tall, enter a Horizontal width of 1000 (the vertical size will automatically resize to retain aspect ratio)
If your image is taller than it is wide, enter a Vertical height of 1000 (the horizontal size will automatically resize to retain aspect ratio) - Keep the “Maintain aspect ratio” option selected
- Do not change the 0 values under the “Skew” heading
- Click the OK button
- Now prepare to save the resized image by clicking the File > Save As menu item
- Use the JPEG format option
- Enter a different filename to avoid overwriting your original file – for example, if your filename is “picture123”, add a suffix to the name such as “picture123-1000px”
- Click the Save button
- Attach that resized file to the email you send for online publicity
Here’s what the Paint application looks like. The “Resize” button is circled in red.

Here’s what the Resize tool form looks like – be sure to select “Pixels” and enter the new size as shown.

